Installation Default Restaurant Ecommerce
Introduction
Quark is the beginning of a revolution in GavickPro theme design. first, we introduced new user-friendly installation and customization options in our themes that take advantage of the WordPress Theme Customizer and page-based frontpage layouts that make matching our demo layout and customizing your website easy.
With Quark, we expand on this concept, creating a long-term theme that offers multiple solutions for a range of needs. Regular updates will provide fixes, new layouts, styles and functionalities so that you can build any kind of website you desire and make it your own.

Guide Structure
This installation guide details installing the theme and matching our demo content and layout, whether you are installing in an existing WordPress instance or starting a new website from scratch. Step-by-step instructions are provided for installation, so you'll have no trouble getting started.
This guide is meant to be read in order, as each step in the installation process will often rely on an earlier step being completed beforehand. Nevertheless, quick links are available in the right side of the screen to allow you to jump to each section instantly if needed.
The Theme's Structure
Quark uses the page-based layout that all our modern themes use. This means that major pages, such as Quark's Frontpage, are created by using page content instead of widgets, which was common in our earlier releases.
To create these complex pages, a base page is created with a special template assigned. Then, subpages are added to this base page, with each subpage creating a new sub-section of the Frontpage.
The benefit of this functionality is that it is possible to match our demo layout in no time at all, making it easy to get started with customizing your website without fiddling around with settings.
For customization, Quark utilizes the WordPress Theme Customizer, affording a real-time preview of changes before they are saved. This lets you adjust layouts, sidebar positions, social media icons, logos and other elements of the page and see the results in an instant for an intuitive, easy-to-use customization experience.
Select Your Preferred Installation Method
Before we begin with the installation, we must decide which installation method is best suited for our needs. There are two installation options available; Quickstart and Manual Installation. Don't let the names mislead you; both installation methods are very simple, but they serve different needs.
If you are only just starting your site, then the quickstart installation is the best option. This is a full WordPress installation that installs WordPress itself, the theme, plugins, configuration and demo content to match our live demo layout exactly. However, this install method is only possible if you are starting a new website; the quickstart cannot be installed in an existing WordPress installation.
If you have an existing WordPress installation with content that you do not want to lose, then you should use the manual installation guide; this method involves some additional steps compared to the quickstart, but you will still be able to match the demo layout without any stress.
Quickstart Installation Guide
The quickstart installation requires very little input from you, and once the files have been uploaded to your server the installation process takes less than 5 minutes. You will need a few things to get started, including FTP access and a database name, username and password. A complete step-by-step guide to the quickstart installation may be found in our documentation:
→ WordPress Quickstart Installation Guide
Manual Installation Guide
The page-based frontpage that is utilized by Quark makes installing the theme and matching the demo layout extremely easy; the majority of the content is imported along with the demo content, but there are some additional steps required if you are to match the demo layout completely. Make sure to follow the steps in this section of the installation guide in order, as each step usually requires that the previous step has been completed already.
The manual installation process can be divided into 5 short steps:
- Install the theme package.
- Install required plugins.
- Import demo content.
- Assign static frontpage.
- Assign menus.
- Place and configure widgets.
Preparing for Theme Installation
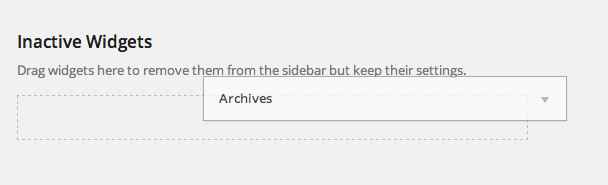
Before starting the installation, it is important to ensure that the process will run smoothly. If you should have existing widgets placed in any positions in your WordPress backend, then these should either be moved into the Inactive Widgets section, or deleted entirely if you no longer wish to use them, so that there are no widgets in any widget positions.
This step is necessary as the widget areas where your widgets are placed are exclusive to the theme; if you move from one theme to another the widgets will often be moved to a new widget area which can damage the overall theme aesthetic. For example, your current theme may only have a single widget position where all widgets are assigned. However, your new theme may have several widget positions; once the theme is installed and activated, the widgets from your old theme may be inadvertently assigned to the first position of the new theme, which may not coincide with your older layout and will damage the theme's aesthetics.
You will also need to decide which style you wish to use; Quark comes with a business landing page as the default style, but additional restyles are available, such as for restaurants. If you are intending to utilize one of these alternative styles, then you will need to do one additional step, which is to install and activate the style as a child theme. You would also need to ensure that you choose the right demo content for your chosen style, to ensure that your site matches the demo exactly. This will be discussed more in-depth later on in this guide.
Download and Install the Theme
- Now that you're ready to install, the first thing to do is download and install the theme package. Click here to visit the Quark download page. There are five files available:

- gk_quark.zip - This is the basic theme package for installing in the WordPress backend, so you should download this package for manual installation. It also includes all additional style child themes, so there's no need to download these styles separately.
- gk_quark_ecommerce_child.zip - This package contains the child theme for the Ecommerce Quark style. This package is not required for new manual installations as the core Quark package includes all child themes, so it can be ignored. Only users running an older version of Quark that they wish to update to the Ecommerce style need this package.
- gk_quark_quickstart.zip - This package is for users who are starting a new site and need to install everything, including WordPress. Since we are installing manually we can ignore this package.
- gk_quark_restaurant_child.zip - This package contains a child theme for Quark - Restaurant. The contents are already included in the main Quark package so this file can be ignored; it is here only for users running an older version of Quark which did not include the restyle files.
- gk_quark_restaurant_quickstart.zip - This is the quickstart package for the restaurant restyle; like with the basic Quark quickstart package this can be ignored as we are installing manually.
- gk_quark_rest_files.zip - This package contains the source PSD files for the theme; useful if you wish to make modifications to the style at the lowest level. This package is not needed for installing or running the theme, so you can ignore it.
Once the gk_quark.zip package has completed downloading, you can begin the installation.
- Login to your WordPress backend and click on Appearance → Themes. in the left menu to be taken to the Themes section of WordPress.
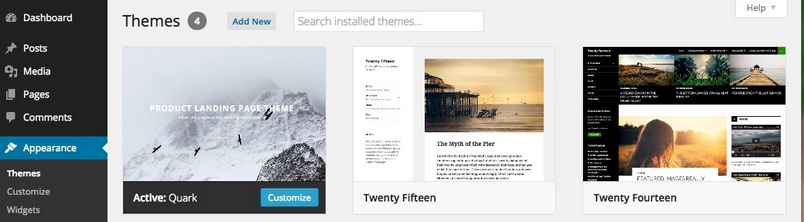
- Click on the blue Add New link at the top of the screen to open the Add Themes page.

- Click on the blue Upload Theme link, located at the top of the screen as with the previous step.
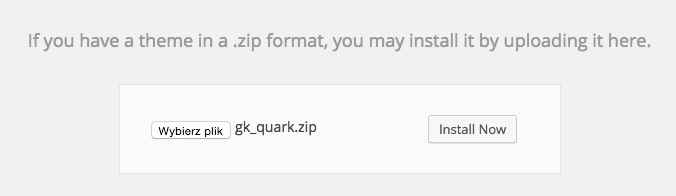
- A dialogue box will open to allow you to select the theme package for upload. Click on the Choose File button and select your just-downloaded gk_quark.zip file. Then, click the Install Now button to start the installation process.
- Wait a few moments whilst WordPress installs the theme's files. Once the install is complete, you will be given three options; Live Preview, Activate, or Return to Themes Page.
Click on Activate if you wish to use the base style. If you wish to use the Restaurant restyle, click on Return to Themes Page. You will see a new theme called Quark Child Restaurant in the list of available themes; hover your mouse over it and then click Activate to start using this restyle.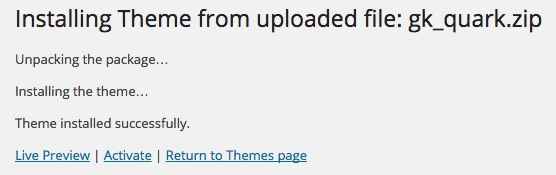
The theme is now installed, and we can move on to installing the plugins.
Install the Plugins
The plugins included with Quark allow you to extend and diversify your content with spectacular features like tabbed content and article previews. Some plugins are required to match the demo layout, whilst others are optional but provide extra features that many users will find useful.
The required plugins are as follows:
- Widget Rules gives you control over which pages and posts a widget should appear on, so you can create specific widget instances to match all types of content.
- GK Taxonomy Images makes it easy to add featured images to taxonomy pages such as category or tag listings.
- News Show Pro creates article previews and showcases. With full control over whether to show featured images, titles and text snippets with multiple display options and pagination, all your best articles can be reached instantly.
- GK Reservation Quark offers a full-featured reservation contact form including party size, time and other important options; perfect for our Restaurant style for Quark.
Note: GK Reservation Quark was created specifically for use in the Restaurant child theme; if you have not activated the child theme (e.g. because you are using the default style) then the option to install this plugin will not appear and can be ignored.
There are also recommended plugins:
- Tabs can create tabbed areas that can display other widgets for truly flexible content. Combined with News Show Pro, you can highlight your latest or most popular posts in tabbed lists.
If you are using the Ecommerce style for WordPress then there will be two additional recommended or required third-party plugins:
- WooCommerce - This is a popular and flexible shop and payment plugin that provides the online shopping features included in the Ecommerce style. As with the GK Reservation Quark plugin, if you are not using the Ecommerce style then this plugin will appear in the recommended install list.
- MailPoet - MailPoet is a full-featured Newsletter plugin that can be used to create newsletter sign-up forms, manage subscribers and send newsletters all from your WordPress backend.
These plugins are not included with the theme files, but they may be installed with very little effort after theme installation.
- After installing and activating the theme a message will appear at the top of the WordPress backend that tells you which recommended or required plugins the theme uses.
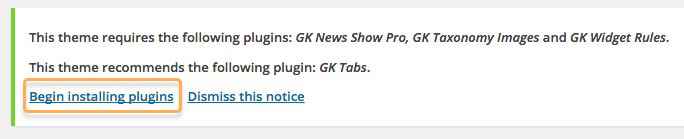
- Click on the Begin Installing Plugins text link that appears underneath the message; you will be taken to the Install Required Plugins screen.
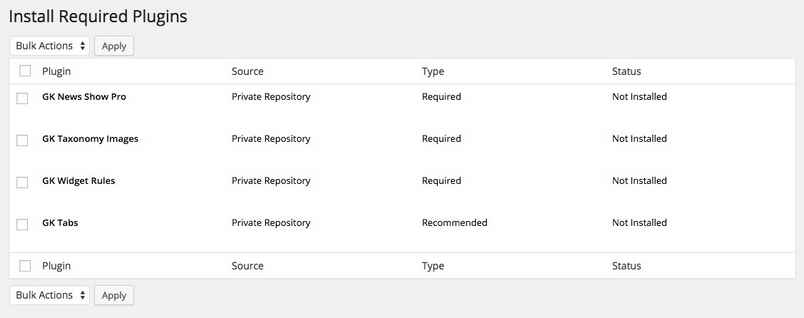
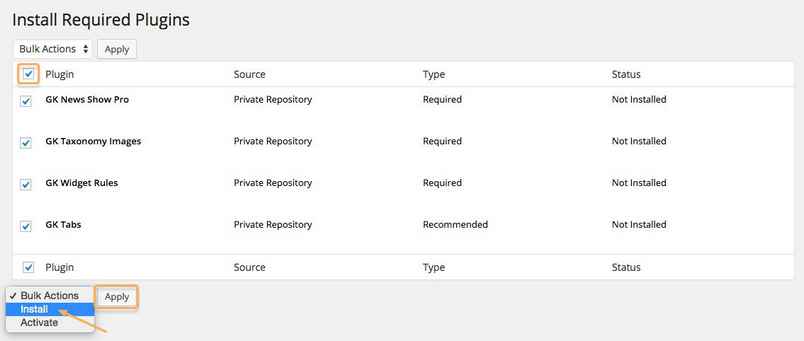
- On this screen there is a list of the recommended and required plugins; to the left of the Plugin title is a tickbox; click on this to add a tick to every plugin. Then, click on the Bulk Actions drop-down list and select Install, then click Apply.
- Allow WordPress to run through the installation process for each plugin; you will see messages advising of each step of installation. Once it finishes, you will see a text link called Return to Required Plugins Installer; click on this link.
- Now that the plugins are installed, all that's left is to activate them. Like before, click on the tickbox next to the Plugin title to add a tick to every plugin, then select Activate in the Bulk Actions drop-down list and click Apply.
- WordPress will activate the plugins as needed after a few moments. Once done, you can proceed to the next step of installation.
Import the Demo Content
This is the most important step in this installation guide, as the demo content includes all the pages that will be used to create your frontpage and match it to the demo. There are two steps to this process; first, we need to install the tool that will let us import the demo content, the WordPress Importer. Then, we need to download the demo content and use the WordPress Importer to import it to our site. You will need to decide which Quark style you wish to use; the basic style or the Restaurant restyle, as they both use different demo content and installing the wrong content for your chosen style will cause many aesthetic issues.
Installing the WordPress Importer
The Import/Export option exists in the WordPress backend even in a new installation, but the core plugin that hands the process is not included with the WordPress core, so it must be installed if you haven't done this already. To do so, follow these steps:
- Log-in to your WordPress backend and click on Tools → Import in the left menu. A new screen will open with a list of options for systems that you can import posts into WordPress from, including Tumblr, LiveJournal and more.
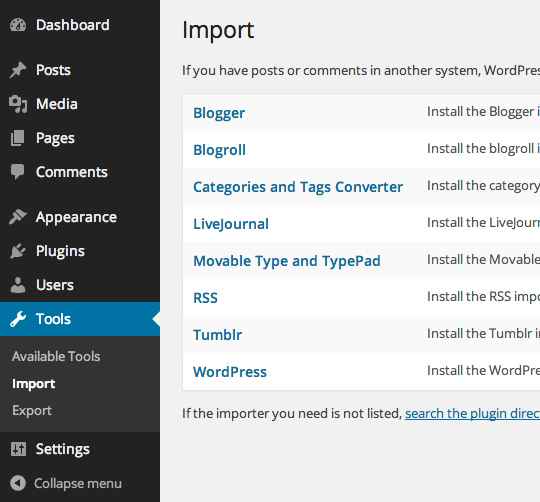
- The demo content we will be importing comes from a WordPress installation, so click on WordPress in the list of systems. A pop-up will open with an option to install the WordPress Importer.
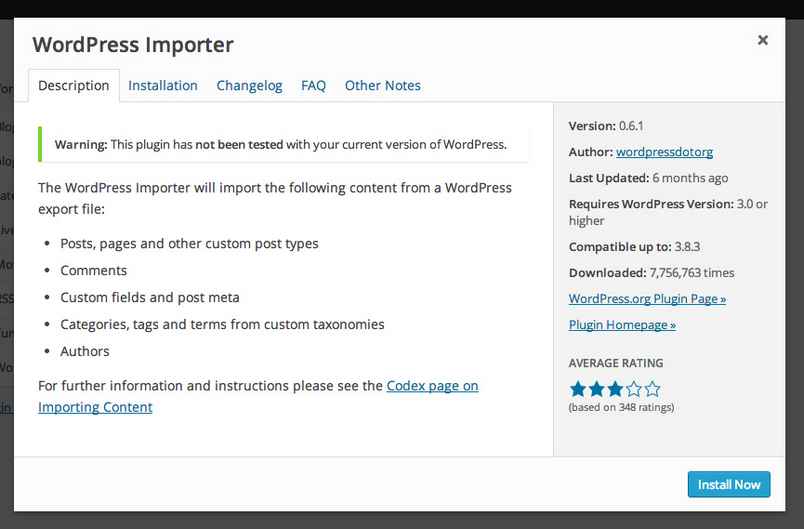
- If you want a bit more information on what can be imported, take a moment to read through the description. Once done, or if you don't fancy reading, you can click the Install Now button to start the installation process.
- WordPress will run through the download and install process automatically, so relax for a moment and let it do its thing. Once the install is complete you will see a message and two text options that let you activate and run the newly-installed plugin, or go back to the list of system importers. We'll be importing our WordPress content soon, so click on Activate Plugin & Run Importer.

After a moment you will be taken to the Importer's start screen, ready for a file to be uploaded. However, we don't yet have the file to upload; we'll take care of that now.
Downloading and Importing the Content
All the demo content data is contained in what WordPress calls a WXR file, though it is more commonly called an XML file. We'll need to download this file and use the WordPress Importer to install it on our site.
First, decide which style you wish to use for Quark. There are currently two options:
- Default - The default style is clean and professional, perfect for business landing pages.
- Restaurant - This style is rustic and warm, just the thing for attracting diners and customers to your eatery.
- Ecommerce - This style provides a focus on product features and options with cart and payment options, perfect for online shops.

Once you've chosen which style you wish to use, we need to download the associated WXR file for Quark. The list of available XML files for our themes may be found here; you will see a list of links, each pointing to a theme's XML file; simply find your chosen style in the list i.e. the XML file for the base Quark style is under Quark, while additional styles are listed under Quark_stylename, such as Quark_restaurant.
If you just click on the links you might encounter an issue; instead of downloading, your browser will instead open and display the file contents automatically. To get around this, we'll need to tell the browser that we want to download, rather than display the file:
- In Safari - Right or control-click on the link and select ‘Download linked file’. This will download a file called Quark.xml.
- In Chrome - Right-click on the link and select ‘Download link as…’. A dialogue box will open to specify where the download should be saved. The name will default to ‘Quark.xml’, so just leave this as default and save the file.
- In Firefox - Right-click on the link and select ‘Save link as…’. A dialogue box will open where you can specify the save location; as with the other browsers the name will default to 'Quark.xml' so leave this as it is.
- In Internet Explorer - Right-click on the link and choose 'Save Target as'. A dialogue box will open so you can decide where to download the file to. The file name will default to 'Quark.xml', so leave this as it is.
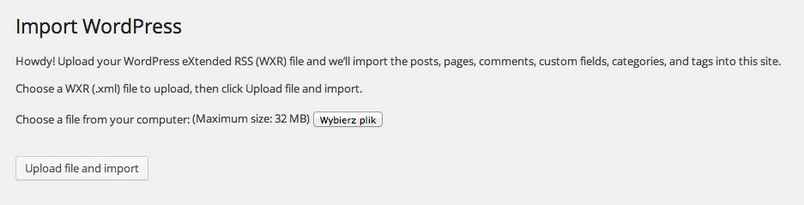
- Navigate back to your WordPress backend and open the WordPress Importer by clicking on Tools → Import → WordPress; if the importer is still open after the install then you may obviously skip this step!
- Click on Choose File and select the 'Quark.xml' file you just downloaded, then click on the Upload file and import button.
- After a few moments you will see the Assign Authors page. This area will let you decide who gets to be in charge of the content you are importing; you may import the original authors, create a new author, or assign the content to your existing users. There may only be one or two authors who may be imported, or there may be as many as ten, especially if the theme includes BuddyPress since each BuddyPress user in the demo content will be considered a separate author. One of the following options will need to be set for each author and their content that is to be imported:
- If the option is left blank - The original creator's username will be imported into your WordPress, and the imported content assigned to the imported username.
- If a name is entered in the 'Create new user with login name' field - The name you wrote in the field will be used as the username for a new user, and the imported content will be assigned to this new user.
- If a user is selected in the 'Assign posts to an existing user' drop-down list - Once the content is imported it will be assigned to the user that you selected in the drop-down box.
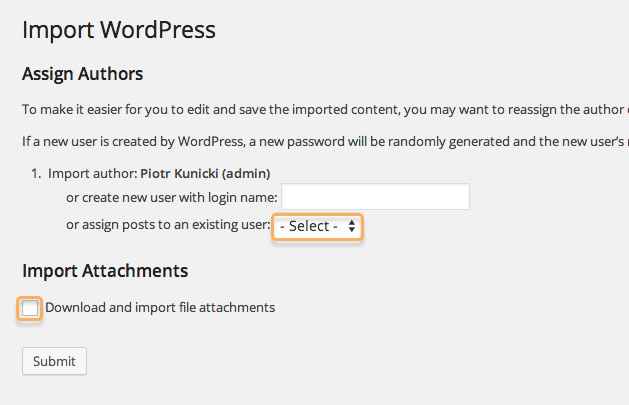
- Now click on the Download and import file attachments tick-box; if selected then the demo placeholder images and other media from the demo will be imported along with the posts.
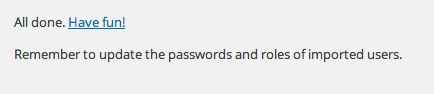
- Finally, click on the Submit button to start the importing process. Wait for the process to complete; once done, you will see a confirmation message letting you know everything is finished.
The demo content is now ready to go, so there are only two steps left; assign the frontpage, and assign the menus.
Assigning the Frontpage
The page that you assign as your static frontpage is the base of operations; it's the first thing people will see when they reach your site. With Quark, the static frontpage serves another purpose; the page-based design of the theme means that the whole, complex frontpage that you see in the demo is created purely from page content. We've already imported the pages and subpages that make up the demo content's frontpage, but we need to set the frontpage template page as our static frontpage:
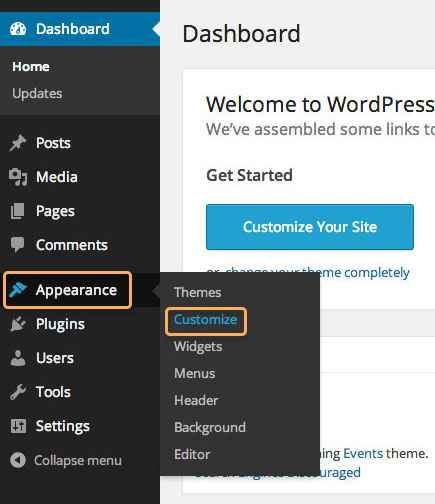
- Log-in to your WordPress backend and open the Theme Customizer by clicking on Appearance → Customize in the left menu.
- Click on the Static Front Page option in the left menu of the Theme Customizer to expand the options.
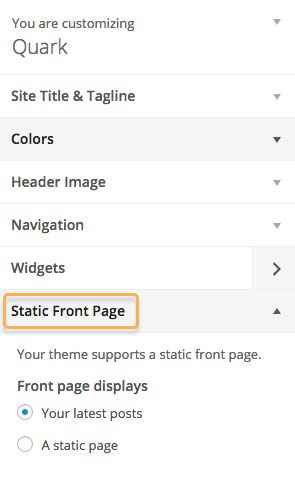
- Under the Front page displays option, click on the radial button for A static page. Two more options will appear; Front page and Posts page.
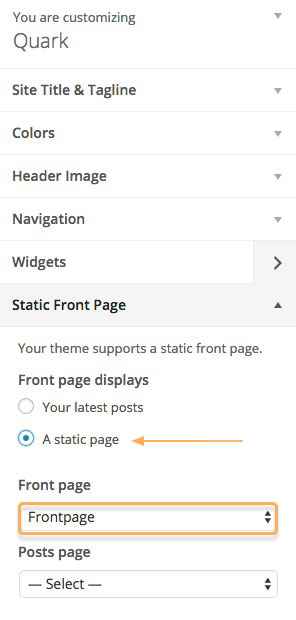
- In the Front page drop-down list, select the page called Frontpage. This is the demo content's base frontpage.
- Click on the blue Save & Publish button at the top of the left menu; this will save your changes.
The frontpage is now set, and its subpages containing the rest of the frontpage content will be automatically laid out to match our demo layout. Try opening your homepage now to see how it looks! Now there's just one more thing to do; assign the menus.
Assigning the Menus
There are two menus in Quark; the main menu, which can be an off-canvas menu or overlaid menu depending your settings, and the footer menu at the bottom of each page.
Like with the Frontpage content, the menus were already imported along with the demo content, so we will just need to assign them to their respective positions in the WordPress Customizer. To do so:
- Open your WordPress dashboard and click on Appearance → Customize in the left menu to open the WordPress Customizer.
- You will see a Navigation tab in the left sidebar of the customizer, where the options are. Click on this tab to expand its options; you'll see the option to assign the menus in each available menu position.
- You can see that there are two available menu locations; Main Menu and Footer Menu. Click on the drop-down box under the Main Menu and select the Main Menu menu option.
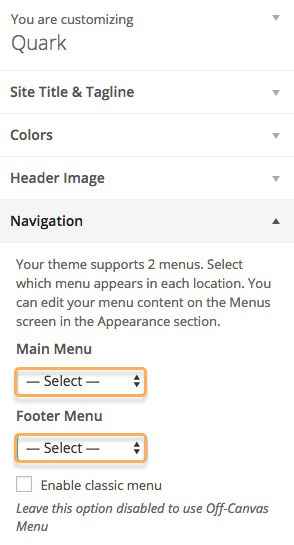
- Click on the Footer Menu drop-down list and assign the Footer Menu to the position.
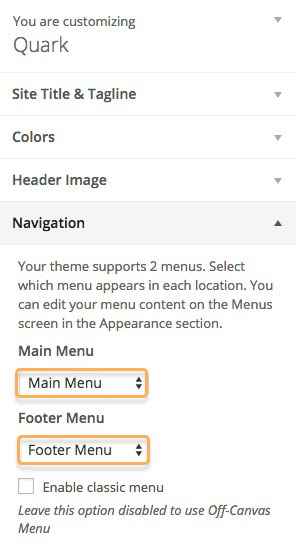
- Click on the Save & Publish button at the top of the sidebar to save the changes.
The menus are now assigned, and there is one final step.
Configuring Widgets
Whilst the frontpage and other special pages content is created via the page-based system, there are some elements from them that also appear on other pages, such as the Newsletter and Contact Details section, as well as Social Icons that only appear under the main menu.
Each of these standalone elements is created using Text widgets with custom HTML content, with our Widget Rules plugin controlling where and when the widgets should appear.
Default Style Widgets
If you are using the default style of Quark, then to completely match the demo layout you will need to install the following widgets.
Newsletter Widget
The Newsletter widget appears at the bottom of the Contact page to provide another way for you to keep in touch with your clients and keep them informed of the latest happenings.

To create this section:
- Log-in to your WordPress dashboard and click on Appearance → Customize to open the Theme Customizer.
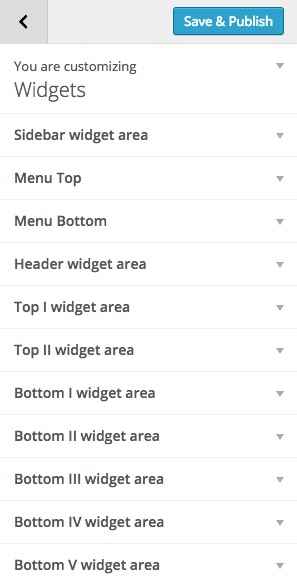
- In the left menu of the Theme Customizer you will see an option labelled Widgets; click on this option. The left-menu will switch to the widget area list:
- Click on the Bottom IV widget area to expand it, then click on the Add a Widget button.
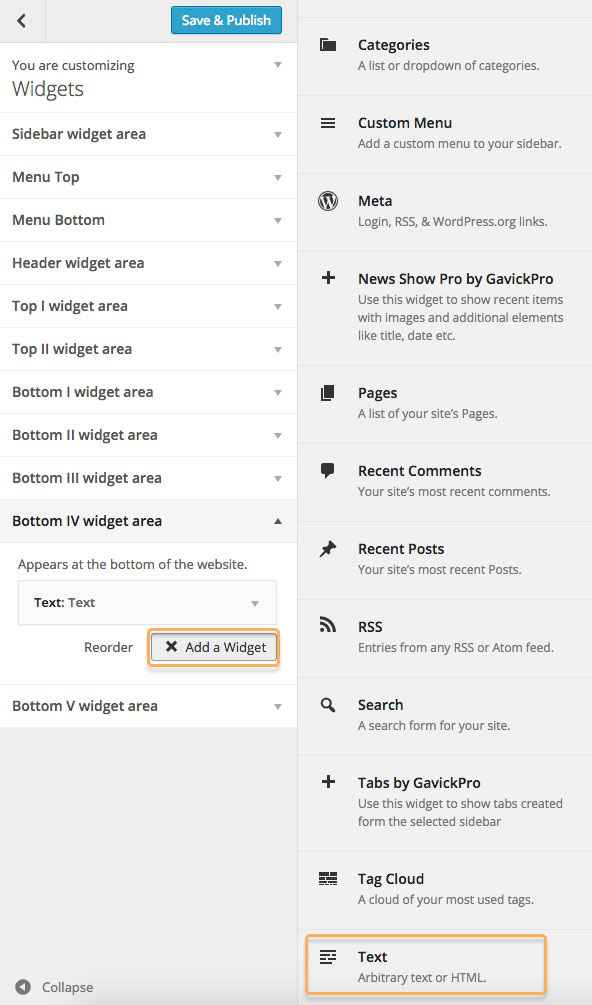
- A list of available widgets will now be listed; select the Text widget. A new instance of this widget will be created in the position, and the options expanded.
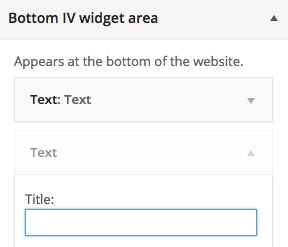
- Copy and paste the following text into the mainbody of the text widget:
<div class="site"><form action="#"><small>Stay up-to-date with latest product</small> <input class="dark btn-border" type="submit" value="Subscribe" /> <input name="email" required="required" type="email" placeholder="Enter your e-mail..." /></form></div>
- Click on the Widget Rules button to expand the options. Change the Visible At option to No pages except:; a new select page to add drop-down list will appear.
- In the Select page to add drop-down list, choose Page. A new option, Page ID/Title/Slug will appear. Add 203 to this field and click Add page.
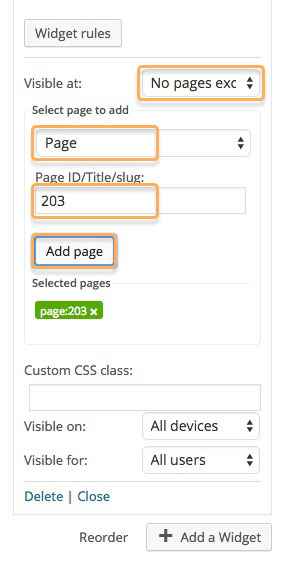
- In the Custom CSS class field, add the following text:
box newsletter dark-bg
- Click on Save & Publish to save the widget.
The newsletter area is now ready to go. Next, we'll add the Contact Details.
Contact Details Widget
The Contact Details appear under the newsletter on the Contact page, and provide additional ways for users to get in touch with you.

To create this section:
- Log-in to your WordPress dashboard and click on Appearance → Customize to open the Theme Customizer.
- In the left menu of the Theme Customizer you will see an option labelled Widgets; click on this option. The left-menu will switch to the widget area list:
- Click on the Bottom V widget area to expand it, then click on the Add a Widget button.
- A list of available widgets will now be listed; select the Text widget. A new instance of this widget will be created in the position, and the options expanded.
- Copy and paste the following text into the mainbody of the text widget:
<div class="gk-cols site" data-cols="3"> <div>email: This email address is being protected from spambots. You need JavaScript enabled to view it.</div> <div class="gk-text-center">tel. 123.456.7890<br />fax: 098.654,3211</div> <div class="gk-text-right">Quaking Row, Kensington,<br />IN, 47699-9366, US</div> </div> - Click on the Widget Rules button to expand the options. Change the Visible At option to No pages except:; a new select page to add drop-down list will appear.
- In the Select page to add drop-down list, choose Page. A new option, Page ID/Title/Slug will appear. Add 203 to this field and click Add page.
- In the Custom CSS class field, add the following text:
box small-spaces small-text
- Click on Save & Publish to save the widget.
The contact details area is now set. Finally, we need to setup the social icons.
Social Icons
The Social Icons appear on the off-canvas menu under the menu links:
![]()
And offer an instant way for users to connect with your social media channels.
To create this section:
- Log-in to your WordPress dashboard and click on Appearance → Customize to open the Theme Customizer.
- In the left menu of the Theme Customizer you will see an option labelled Widgets; click on this option. The left-menu will switch to the widget area list:
- Click on the Menu Bottom widget area to expand it, then click on the Add a Widget button.
- A list of available widgets will now be listed; select the Text widget. A new instance of this widget will be created in the position, and the options expanded.
- Copy and paste the following text into the mainbody of the text widget:
<div class="gk-social-icons">
<a href="#"><i class="gkicon-fb"></i></a>
<a href="#"><i class="gkicon-twitter"></i></a>
<a href="#"><i class="gkicon-gplus"></i></a>
<a href="#"><i class="gkicon-pinterest"></i></a>
<a href="#"><i class="gkicon-behance"></i></a>
<a href="#"><i class="gkicon-dribbble"></i></a>
<a href="#"><i class="gkicon-instagram"></i></a>
<a href="#"><i class="gkicon-rss"></i></a>
<a href="#"><i class="gkicon-youtube"></i></a>
<a href="#"><i class="gkicon-vimeo"></i></a>
<a href="#"><i class="gkicon-linkedin"></i></a>
</div>
- Click on Save & Publish to save the widget.
That's it! Your site should now match the demo layout exactly, so you can get started with customizing it to your liking.
Restaurant Style Widgets
If you've chosen to use the Restaurant style for Quark, you should install the following widgets.
Newsletter Widget
The Newsletter widget appears at the bottom of the Contact page to provide another way for you to keep in touch with your clients and keep them informed of the latest happenings.
To create this section:
- Log-in to your WordPress dashboard and click on Appearance → Customize to open the Theme Customizer.
- In the left menu of the Theme Customizer you will see an option labelled Widgets; click on this option. The left-menu will switch to the widget area list:
- Click on the Bottom IV widget area to expand it, then click on the Add a Widget button.
- A list of available widgets will now be listed; select the Text widget. A new instance of this widget will be created in the position, and the options expanded.
- Copy and paste the following text into the mainbody of the text widget:
<div class="site"><form action="#"><small>Stay up-to-date with latest product</small> <input class="dark btn-border" type="submit" value="Subscribe" /> <input name="email" required="required" type="email" placeholder="Enter your e-mail..." /></form></div>
- Click on the Widget Rules button to expand the options. Change the Visible At option to No pages except:; a new select page to add drop-down list will appear.
- In the Select page to add drop-down list, choose Page. A new option, Page ID/Title/Slug will appear. Add 203 to this field and click Add page.
- In the Custom CSS class field, add the following text:
box newsletter dark-bg
- Click on Save & Publish to save the widget.
The newsletter area is now ready to go. Next, we'll add the Contact Details.
Contact Details Widget
The Contact Details appear under the newsletter on the Contact page, and provide additional ways for users to get in touch with you.

To create this section:
- Log-in to your WordPress dashboard and click on Appearance → Customize to open the Theme Customizer.
- In the left menu of the Theme Customizer you will see an option labelled Widgets; click on this option. The left-menu will switch to the widget area list:
- Click on the Bottom V widget area to expand it, then click on the Add a Widget button.
- A list of available widgets will now be listed; select the Text widget. A new instance of this widget will be created in the position, and the options expanded.
- Copy and paste the following text into the mainbody of the text widget:
<div class="gk-cols site" data-cols="4">
<div class="col-width-40 col-t-width-50">
<strong>Hours</strong>
<div class="gk-cols" data-cols="2">
<div>
<p>Monday - Friday <br>10.00am - 5.30am</p>
</div>
<div>
<p>Saturday - Sunday <br>12.00am - 10pm</p>
</div>
</div>
</div>
<div class="col-width-25  col-t-width-50">
<strong>Location</strong>
<p>Quaking Row, Kensington, <br>
IN, 47699-9366, US</p>
</div>
<div class="col-width-20  col-t-width-50">
<strong>Phone</strong>
<p>tel. 123.456.7890<br>
fax: 098.654,3211</p>
</div>
<div class="col-width-15  col-t-width-50">
<strong>Connect with us</strong>
<p>
<a href="#" class="gk-social-link"><i class="gkicon-twitter"></i> Twitter</a><br>
<a href="#" class="gk-social-link"><i class="gkicon-fb"></i> Facebook</a>
</p>
</div>
</div>
- Click on the Widget Rules button to expand the options. Change the Visible At option to No pages except:; a new select page to add drop-down list will appear.
- In the Select page to add drop-down list, choose Page. A new option, Page ID/Title/Slug will appear. Add 78 to this field and click Add page.
- In the Custom CSS class field, add the following text:
small-spaces small-text
- Click on Save & Publish to save the widget.
The contact details area is now set. Finally, we need to setup the social icons.
Social Icons
The Social Icons widget is created exactly the same way as in the default style; for info on how to configure this widget please refer to the guide in the Default Style Widgets → Social Icons section.
That's it! Your site should now match the demo layout exactly, so you can get started with customizing it to your liking.
Ecommerce Style Widgets
The Ecommerce style for Quark requires less widgets than the other styles, but the widgets it does use are very important as they control the shopping cart and newsletter sign-up sections of your site.
MailPoet Newsletter Form
MailPoet is a complete newsletter plugin that allows you to create subscription forms, manage subscriber lists and email newsletter via your WordPress backend. In Ecommerce, a specific newsletter subscription form is created in the MailPoet form editor that uses the core form but also adds custom HTML before and after, which are then used to create the newsletter area layout.
This newsletter and the call-to-action surrounding it appears in a newsletter pop-up that automatically appears in the bottom-right of the screen after a delay (the length of the delay is set in the Theme Customizer).
To setup this widget, we'll first need to create the form in MailPoet, and then assign it to a widget area.
Creating the Newsletter Form
Creating the new form is fairly simple, but it does require accuracy since the HTML and layout will be styled by our CSS rules to appear in the pop-up. To create the form, follow these steps:
- In your WordPress backend, click on MailPoet → Settings to open the settings menu.
- Click on the Forms tab at the top of the page to view your forms; usually there will be an example form in this section, but we'll start from scratch, so click on the Create a new form button above the list.
- You will see the Edit New Form page; this section has a preview block where various elements, such as dividers, name & email fields etc... can be dragged and dropped to create the form. We're going to create a form made up of four blocks; HTML code at the top and bottom, with a email address field and submit button in the middle.>
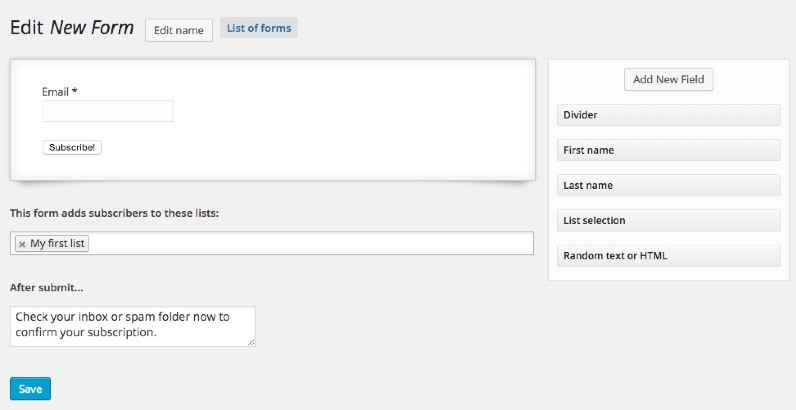
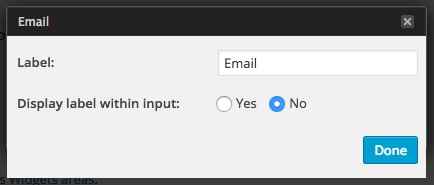
- The default layout for the new form already includes an email field and submit button in the proper places; all that we need to do is change their text to fit our requirements and add the HTML above and below. Hover your mouse cursor over the E-mail field; you will see an overlay appear. Click on the Edit Display button.
- You will see two options; Label, which decides the name for the field, and Display label within input, which decides whether the label appears in or above the field. Change the Label field to "Enter Email Address" and set Display label within input to Yes, and click Done to save.
- Hover your cursor over the Subscribe! button and click Edit Display. You will see one option, Label. Change this to "Submit" and click Done.
- Now we need to add the HTML text above and below the email field and submit button. To the right of the preview layout are a set of different elements that can be added. Click and hold on a Random text or HTML element at the bottom of the list; the preview field will automatically display the available slots for the element.
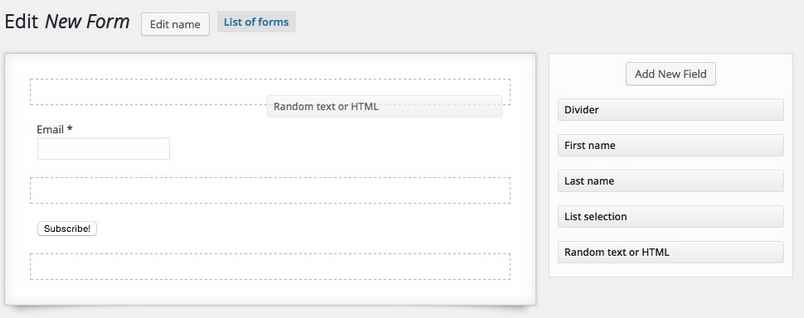
- Drag the Random text or HTML element to the field at the top of the area, above the Email field. Then, grab a second Random text or HTML element and drag it to the free field under the Submit button.
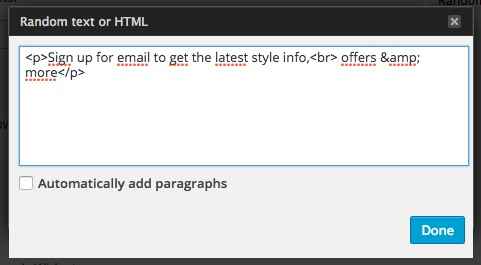
- Now we can set the HTML code. Hover your cursor over the top HTML element (it will have some example text here at the moment) and click on Edit Display to see the text field where you may enter your HTML code. Delete the existing placeholder text and replace it with the following HTML, then click Done:
<p>Sign up for email to get the latest style info,<br> offers & more</p>
- Now open the bottom HTML element by hovering over it and clicking Edit Display. Replace the placeholder text with the following HTML code, then click Done:
<small> Check out our <a href="#">Privacy Policy</a> & <a href="#">Terms of use</a><br> You can unsubscribe from email list at any time </small>
- The form is now ready, so click on the Edit Name button at the top of the page and enter a name for your new form, then click the Save button at the bottom of the section.
The newsletter form is now ready, and we can focus on placing the widget needed to display its content in the pop-up.
Creating the Newsletter Widget
You'll be happy to know that placing your newsletter form is much easier than creating it! To place your newsletter widget, follow these steps:
- Click on Appearance → Widgets in your WordPress backend to go to the Widgets screen.
- Click on a MailPoet Subscription Form widget on the left of the screen, and drag and drop it onto the Newsletter widget area on the right of the screen. The new widget will be created and the options will automatically expand.

- In the Title field of the widget, enter the following text:
Get Hooked Up!
- In the Select a form drop-down list, select your recently-created newsletter.
- Click on the Save button to save the widget.
Your newsletter form is now placed, and will appear automatically as a popup on your site.
The Shopping Cart Widget
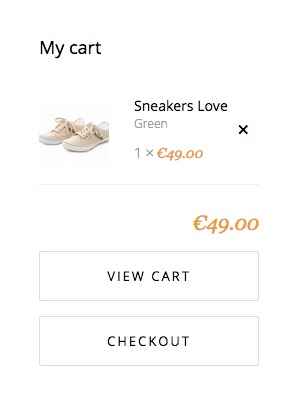
The shopping cart is the standard widget from WooCommerce, with styling to help it match the aesthetic of Ecommerce. This means that it requires very little effort to setup the widget. To do so, follow these steps:
- In the left menu of your WordPress admin area, click on Appearance → Widgets to open the Widgets area.
- Click and hold on a WooCommerce Cart widget in the left of the screen, then drag it to the Cart widget area on the right-hand side of the page; the widget will be placed and options expanded.
- In the Title field, enter the following text:
My cart
- Click on the Save button to save the widget.
The shopping cart widget is now ready, and your installation is ready to go.