Add flair to your Joomla menu with effective icons
One of the fundamental things in Joomla web design in reference to usability is navigation. By default our templates’ use of colors, highlights and mouse-over effects simplifies detection of the items that are being searched by the user.
The use of icons beside menu items is a useful alternative that favors a quick visual option identification; and even the use of icons without accompanying text is viable. Icons on the menu – it’s not a new idea; this approach has been used on websites for several years. In particular, it may be useful to eliminate ‘Home’ or ‘Start’ buttons.
What is interesting is that it is very easy to do using the following solution both in Joomla 2.5 and Joomla 3.2. If you want to add icons (PNG/GIF) to your menu, you first have to upload your icons to the your_site_root/images folder. Please note that the icons should not exceed 16 x 16 pixels; it must be that resolution if you want to avoid menu layout breaks. Advanced users can use bigger icons by customizing menu style classes.
#1: How to add icons to a menu using Menu Manager
If you’d like to display icons for drop-down menu items; from the administration option of your website, navigate to Menus –> Main Menu. In the next step, click on any menu item to add a suitable icon for it.
On the right-hand side you will find a list of parameter categories, e.g. Page Display Options, Link Type Options. Depending on the Menu Item Type there will be a parameter called Link Image in one of these parameter categories i.e. if your Menu Item Type is an External Link, you will find the Link Image parameter in Link Type Options.
![]()
Use the “Select” button to choose images (icons) from your /image folder.
![]()
Now click the Save button to apply these changes.
![]()
How to add extra space (padding) between icon and menu label
You have two options:
- Use a little bit wider icon with small transparency space on the right side. (It request to use Graphic Software)
- Or use this CSS code:
#menu949 > img { padding-right: 5px; }
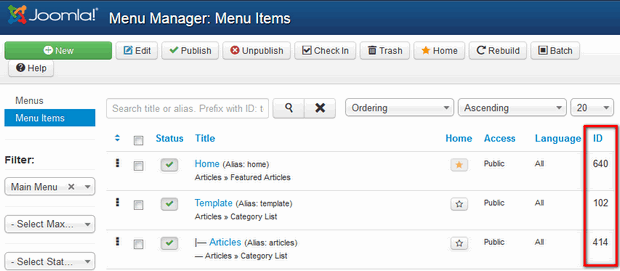
Where 949 – is your menu item ID from Menu Manager. Those ID numbers are on the last right column.

Menu item ID – in Menu Manager
#2: How to add graphic icons to a menu using CSS
The second method is based on css class (with image) for selected menu items. To use this method you have to know the ID of each menu item position where you want to add an icon. In the Menu Manager in the last column you should see all menu item ID’s.

Now you have checked the Menu item ID you are ready to add an icon for this item only or multiple items if you need more icons. In my example I will show you how to add an icon for “Template” with ID 102, so I have to use the following code:
#gkMainMenu .gkMenu > ul > li > a#menu102
{background: url('link-to-image') no-repeat left;
padding-left:24px; }
![]()
Tip: how to use custom CSS in Gavick templates.
My example result (“pen” icon near TEMPLATE label)
![]()
#3: How to add Font Awesome vector icons in a menu using CSS
To use this method please start reading from the beginning of method #2, but skip the section about inserting graphic icons. Let’s do a small modification in only one file /css/font-awesome.css – from your template folder. In line ~37 after the comma please add your ID, like so:
[class^="icon-"],
[class*=" icon-"], #menu102 {
  font-family: FontAwesome;
  font-weight: normal;
  font-style: normal;
  text-decoration: inherit;
  -webkit-font-smoothing: antialiased;
  *margin-right: .3em;
}
Now find the icon name that suits your needs, for example “magic”, and add after the comma your menu ID with a “:before” tag.
.icon-magic:before, #menu102:before {
  content: "\f0d0";
}
Upload or save changed file – that’s all that’s required. Refresh your page, after few seconds you should see an icon from Font Awesome near your menu item.
![]()
Menu without labels
If you want to create Menu items without labels you have to use a different technique – because in quickstart we have used the GK Menu Extended Parameters plugin (plg_gkextmenu). To disable menu item names you have to hide them, especially if you don’t want to hack the template core file.
First, you have to know the ID of each menu item position you want to modify. In Menu Manager in the last column you will see all the menu items ID’s.
Second, use this simple code as an example:
a#menu102 { font-size: 0; line-height: 62px; }
This code allows you to hide labels from users and centers the menu icon to the middle.

You probably don’t have to worry about SEO/UX if you only use this method for one item.
This article was first published
